Mastering Your Sublimation Projects with the 3D Starfish Mug Wrap Png 1
There is a distinct satisfaction in holding a mug that you designed yourself, especially when the artwork wraps seamlessly around the curve without distortion or gaps. For creators looking to capture that coastal vibe, the 3D Starfish Mug Wrap Png 1 offers a stunning solution. This digital asset features a high-resolution, three-dimensional starfish design set against a complementary background, specifically engineered for 20 oz skinny mugs and straight-walled tumblers. However, jumping into sublimation with a new digital download often leads to preventable errors if you do not understand the nuances of file preparation and printer settings. Many enthusiasts rush from purchase to press, overlooking critical details that can turn a professional-looking design into a blurry or misaligned disappointment.
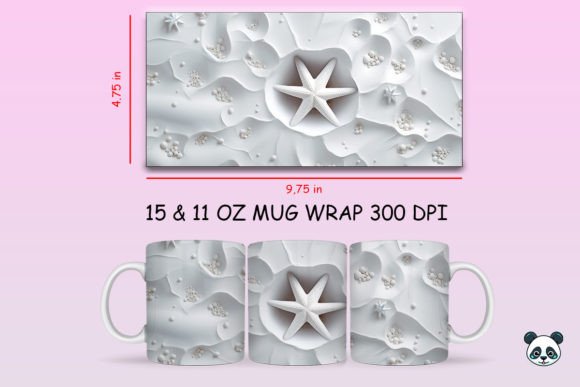
The primary appeal of this specific design lies in its "3D" aesthetic. Unlike flat vector art, this PNG utilizes shading and depth to make the starfish appear as though it is resting on the surface of the mug. When executed correctly, the result is a tactile visual experience that elevates a standard drinkware item into a piece of art. Yet, the very feature that makes it attractive—the complex layering of the 3D effect—requires careful handling during the printing phase. A common misunderstanding among beginners is assuming that a "digital download" is ready to print immediately upon opening. While the file provided is indeed high quality at 300 DPI and sized approximately 9.75 inches by 4.75 inches, your workflow determines the final output.
Avoiding Resolution and Scaling Pitfalls
One of the most frequent mistakes occurs when users inadvertently resize the image within their design software. The 3D Starfish Mug Wrap Png 1 is optimized for a specific dimensions to fit a 20 oz skinny mug perfectly. If you stretch the image to fit a different mug size, such as an 11 oz or 15 oz template, without maintaining the aspect ratio or checking the effective resolution, you risk pixelation. The 3D details, which rely on subtle gradients to create depth, are the first to suffer when an image is upscaled beyond its native capabilities. Instead of a crisp starfish, you end up with a blocky, amateurish graphic.
To avoid this, always check the image properties in your editing software before placing it on your mug template. Ensure the resolution remains at 300 DPI at the final print size. If you intend to use this design on a smaller mug, do not simply shrink the entire wrap; consider cropping the seamless pattern or adjusting the composition so the main starfish element remains prominent without losing detail. Remember, sublimation ink spreads slightly into the polymer coating of the mug, so starting with the sharpest possible source file is non-negotiable for professional results.
The Critical Role of Color Management
Another area where projects often go wrong is color management. Digital screens display colors in RGB (Red, Green, Blue), while sublimation printers operate in CMYK (Cyan, Magenta, Yellow, Key/Black). The vibrant blues and sandy tones in the Starfish watercolor background may look vivid on your monitor but can print dull or shifted if not profiled correctly. A common error is printing directly from a web browser or an uncalibrated design tool without applying an ICC profile specific to your printer, ink, and paper combination.
When the colors shift, the 3D illusion breaks. The shadows that give the starfish its depth might print too light, making the design look flat, or too dark, merging the subject into the background. To correct this, perform a test print on plain paper first. Hold the test print next to your screen to gauge the color variance. Adjust your soft-proofing settings in your design software to match your printer's output. This small step saves money on blank mugs and sublimation paper, ensuring that the oceanic hues remain true to the original design intent.
Alignment and the Seamless Pattern Challenge
Working with a seamless pattern or a full wrap design introduces the challenge of alignment. The 3D Starfish Mug Wrap Png 1 is designed to wrap around the circumference of a skinny mug. A frequent oversight is failing to account for the "handle gap." If you center the design incorrectly, the seam where the paper overlaps might cut right through the main starfish, ruining the visual continuity. Furthermore, because this is a 3D design, the perspective matters. If the wrap is applied too high or too low on the taper of the mug, the curvature can distort the 3D effect, making the starfish look warped.
Before pressing, use heat-resistant tape to secure your transfer paper tightly. For skinny mugs, it is often helpful to mark the center of the mug and the center of your printed design with a light pencil mark on the paper (outside the print area) to ensure perfect alignment. When dealing with the background, ensure the pattern flows naturally across the seam. Since this file includes a Starfish 3D seamless pattern, you have the flexibility to extend the background if needed, but precision in placement is key to maintaining the immersive 3D look.
Understanding File Formats and Usability
It is also vital to understand what you are purchasing. This product is a Digital Download containing a ZIP file with a single high-quality PNG. Some buyers mistakenly expect physical mugs or editable vector files (like SVG or AI) included in the package. This is a raster image, meaning it is composed of pixels. While 300 DPI is excellent for printing, it is not infinitely scalable like a vector. Knowing how to use these files for sublimation printing is a prerequisite. If you are unfamiliar with unzipping files, importing PNGs into software like Photoshop, Canva, or Silhouette Studio, take a moment to learn these basics before expecting a flawless result.
Additionally, remember that this item does not include any physical components. You will need your own sublimation printer, ink, paper, blanks (specifically 20 oz skinny mugs with a polymer coating), and a heat source (oven, mug press, or convection heater). Ensuring your mug blank is high-quality is just as important as the design itself. A low-coating mug will result in faded colors and poor durability, regardless of how perfect your 3D Mug Wrap file is.
Making the Right Choice for Your Business
For entrepreneurs and small business owners, consistency is key. Using a pre-made, high-quality design like the Starfish Mug Wrap allows you to maintain a professional standard without hiring a graphic designer for every product. However, do not rely solely on one design. Use this starfish theme as part of a broader collection. Pair it with other ocean-themed wraps or solid colors to offer variety to your customers. Evaluate the design not just for its beauty, but for its marketability. Does the 3D effect stand out in product photos? Does the color scheme appeal to your target demographic?
Before finalizing your decision to use this design for a large batch, print one sample. Check for banding lines, color accuracy, and wrap alignment. Verify that the 9.75 x 4.75 inch dimensions fit your specific mug brand, as "20 oz skinny mug" can vary slightly between manufacturers. By taking these corrective steps and approaching the 3D Starfish Mug Wrap Png 1 with a mindset focused on quality control, you transform a simple digital file into a profitable, beautiful physical product. The difference between a hobbyist result and a professional finish often lies in these overlooked details.